Falling Down the Thames Blog 31, 15th October 2014
Our Paddling Repair Kit
They say that admitting you are a gear junkie is half the battle. Well, I am pretty sure that volunteering to assemble our field repair kit served only to fuel my addiction to all things designed for the outdoors.
Glen and I are hardly going to be in the backcountry when we paddle down the River Thames and around the north and east coasts of Kent. Having said that, it is important to always be prepared for any scenario involving a medical, safety or mechanical crisis, whether you are 300 kilometres from help or 300 metres from a five-star hotel. Our first aid and safety kits will be described in later blogs. Here I will detail the contents and assembly of our Paddling Repair Kit.
I considered what items might suddenly be in need of in-the-field or on-the-water repair or replacement. These include our canoe trailer (including its inflatable tires), the body of the canoe and sea kayak, the canoe seats, any part of the kayak rudder and foot rests, the kayak sprayskirts, the bow or stern lines, our outerwear, paddles (our solution is to have 1-2 spares), our PFDs, our shoes/boots, our packs, our glasses, the GPS unit, our headlamps, and our cameras.
As with most outdoor gear choices, we wanted the items to ideally be of high quality, lightweight, compact and reliable. We also wanted to minimize redundancy, so including an item that could serve multiple purposes was a huge plus. Finally, the gear needs to kept in a sturdy waterproof container and be organized such that each item could be easily located and retrieved.
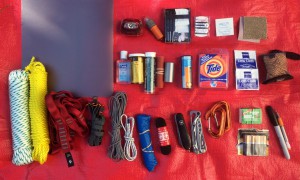
The contents of our repair kit are, from top to bottom, left to right:
- plastic cover from a flexible 3-ring binder to patch a hole in the boat. It also makes a great cutting board;
- Petzl headlamp;
- waterproof mini flashlight;
- travel watch repair kit;
- travel sewing kit, including two extra large needles for penetrating spray skirt material;
- alcohol swabs to clean surfaces prior to repair;
- sand paper, both medium and coarse grains;
- alcohol hand sanitize;
- used pill vial containing Aquaseal, Crazy Glue, Seamseal, safety pins, and elastic bands;
- PC Marine epoxy putty, which works on wet surfaces;
- nylon fabric adhesive patches;
- nine metres of duct tape;
- Gear Aid Tenacious Tape;
- Tide travel laundry detergent;
- premoistened lens cleaners;
- small pack towel;
- nine metres of polyethelene utility rope, 4mm diameter, to use as spare rudder cable;
- nine metres of polyester floating rope to use as a spare bow/stern line or throw rope;
- daisy chain;
- accessory straps with buckles. Pictured are Sea to Summit Accessory Straps;
- thin cord, 3mm x 9m. Pictured is Sea to Summit Reflective Cord)
- waterproof thick vinyl cut from a Dollar Store poncho, 40cmx40cm to use as a kayak hatch cover in case original is lost;
- one metre of shock cord, 2-3mm to secure a makeshift hatch cover, and cord lock;
- pair of shoelaces;
- Swiss Army knife;
- multitool with pliers (Leatherman Skeletool);
- mini carabiners, made for climbing;
- waterproof matches;
- spare batteries for headlamps, GPS unit, and water purifier;
- Sharpie permanent marker; and
- a pencil
In the photos, the gear is sitting on an All Weather Emergency Blanket (I take this with me on all outdoor excursions. It is waterproof and fabulous to use as a ground tarp, an over-the-head tarp, an emergency blanket, and to place under a sleeping bag for additional insulation. Not pictured are: Gorilla Tape, waterproof notebook, dental floss (for sewing, etc), spare nuts and bolts for rudder, bandana, extra plastic buckles.
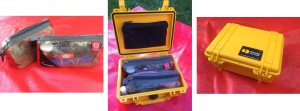
Since many of the repair items are cylindrical rather than flat, I found that traditional first aid bags did not work very well. Instead, I used two small Insight transparent accessory bags purchased from the travel section at Mountain Equipment Co-Op. One bag contains our quick-reach items (multitools, matches, pack towel and flashlights), and the other bag contains the remaining items. I found that both bags fit perfectly into a Pelican watertight case (size 1150). For additional storage, I glued a small zippered pocket to the inside of the Pelican case for storing the waterproof notebook, pencil and indelible marker.
Finally, the 30m-long ropes are stored in a small mesh bag, along with our bow and stern lines. The All Weather Emergency Blanket is rolled up and stored in a small ditty sac.
We would welcome your comments on the above items, including what gear has made it into your own field repair kit. Watch out for our later blogs detailing our First Aid Kit and Safety Kit.
- Krista


A couple of minor repair items I bring — and have had to use — are generic plastic bags from grocery stores and a candle. I developed a crack in my canoe keel during field work. I was days from help unless I used a sat phone for emergencies, and I had to reach a survey site before the birds stopped singing. A temporary quick repair to stop the water from bubbling up was to use the candle to set fire to the plastic bag, let the bag drip flaming plastic into the crack (makes a neat whoosh sound), smooth it if necessary with a stick, drip more and fill any holes. To my surprise it worked, took about 10 minutes; later I did a proper fix, and the plastic seal just popped out cleanly when pried. The canoe was fibreglass, not Kevlar or ABS plastic, though.
Later I found one of those toy green plastic soldiers worked well, as grocery bags were becoming more recyclable and didn’t melt properly, but plastic bags are still my choice because they have other uses. Eg Plastic bags are also great for wearing over your last pair of dry socks when you have to put on wet shoes. Keeps your socks dry(er). People, including numerous guides who should know better, will say your feet will get as wet from sweat as if you didn’t use plastic bags, but it isn’t true: your feet stop sweating when humidity reaches a certain point. I had to look that up when I discovered my feet didn’t get soaking wet with sweat but remained cosy, warm, and just a bit damp rather than wet.
As a bit of background, I’ve been doing wilderness canoeing/kayaking since late 70s, then ended up becoming a field biologist who gets flown into remote wilderness, mountain, boreal, Arctic sites where my previous skills in the bush were put to good use.
Best wishes on your trip. Look forward to reading about it.
Ken – Thank you very much for you comments. Those are terrific suggestions and we will remember them. (I have a use for my brother’s GI Joe figurines!) Best wishes for your future wilderness adventures. Krista